Tutorial 04: Burning Tea
In this tutorial you will learn how to add light sources to your simulations, animate collision objects and manipulate the collisions to meet your approval.
In 3ds Max, select File->Open, and from your /Scenes/FumeFX/ Tutorials folder, select the file Tut_04_start.max.
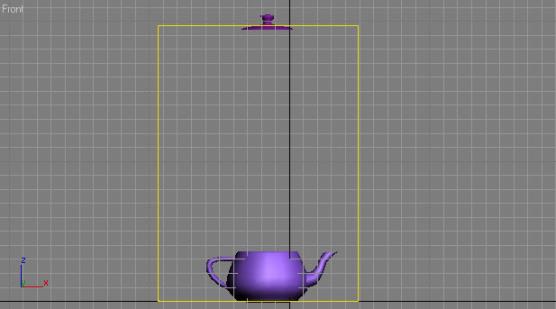
In this scene we have a teapot and an animated lid that comes down to collide with smoke and fire that will be pouring out from the source inside of the teapot. Fortunately, no one will have to call the fire department.
To get started, we'll quickly go through the standard setup tasks that should now be starting to become familiar to you.
Create a FumeFX Grid over both the teapot and lid objects at Frame 0 so that it encompasses both (shown in the image above).
Next, create a FumeFX Object Source helper and select the object named bottom for your Source.
Finally, open the FumeFX UI floating dialog and from within the General tab set your output path for the simulation. If you've followed our suggestion, simply create a new sub-folder called \Tut04 beneath the \FumeFXSimData folder.
Now, you need to set up the overall simulation parameters.
Still within the General tab, under the General Parameters change group of controls, change the Spacing value to 1.0 to provide a nice, dense volume of voxels to simulate with.
Now click on the Simulation tab within the FumeFX UI floating dialog.
Under the Simulation group of controls, set the Quality value to 5, Maximum Iterations to 300 and Time Scale to 2.5.
Set Vorticity to 1.0, Smoke Buoyancy to 0 and Temperature Buoyancy to 0.7.
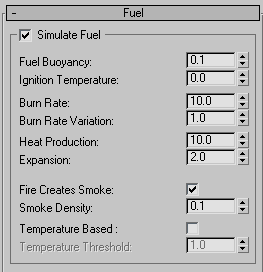
Now go to the Fuel rollout and set the following parameters:
Ignition Temperature spinner to 0.0
Burn Rate spinner to 10.0
Burn Rate Variation spinner to 1.0.
Expansion spinner to 2.0.
After those are set, click on the Rendering tab in the FumeFX UI floating dialog.
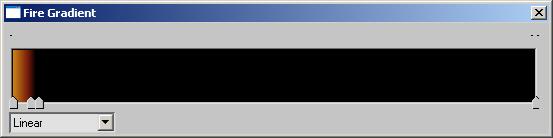
Go to the Fire rollout, and then right-click on the Fire Gradient color swatch. Choose Key Mode to turn it into a gradient.
Change the Fire Gradient colors to roughly match the image below. This will give the fire a nice warm color.
Move further down the Rendering tab to the Smoke rollout and change the Smoke Opacity spinner value to 20.0.
With many of the parameters set for the fire and smoke, it's time to move onto lighting. Lights can be added directly into the FumeFX simulation in order to have them affect the coloration and illumination of the smoke within the final rendered output. This includes support for multiple scattering, which gives smoke nice softness when it interacts with other scene objects.
Select the Illumination tab in the FumeFX UI.
There is currently one Omni light in the scene with standard 3ds Max shadow maps, and we'll use this to illuminate the smoke and fire (and the teapot) in the simulation.
Click on the Pick button and then select the Onmi01 as your light source.
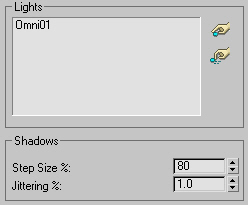
Just as is the case with the Obj/Src list window, the Omni light will now show within the window.
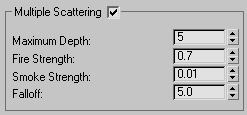
Still within the Illumination tab, make sure that the Multiple Scattering checkbox is activated so we can manipulate how the lighting will blend into the smoke and fire.
Next, change the Multiple Scattering parameters as follows:
Maximum Depth spinner to 5
Fire Strength spinner to 0.7
Smoke Strength spinner to 0.01
Falloff spinner to 5.0
Finally, it's time to add our Sources and collisions to the FumeFX simulation system.
Select the Obj/SRC tab in the FumeFX UI floating dialog and click the Pick button.
In the 3ds Max viewports, select the FFX Object Src01 you created earlier as your Source.
Next, click the Pick button again, and select the teapot bottom (named body). Change the collision type to Shell.
This will tell FumeFX that the object is hollow and it will allow internal interactions with the simulation as the teapot bursts into flames.
Finally, click the Pick button one more time and choose the teapot top (named top surprisingly enough) and change its collision type to Shell just as you did with the body. Then change the SpeedMul spinner value to 3.0. This gives the collision object a little force around it to collide with the smoke and fire.
At this point, you should have all three of your objects in the scene as shown below.

With all of the objects / sources present, we need to make some final adjustments to the Object Source by applying an animated map to the Fuel and Temperature channels.
Make sure the FFX Object Src01 is highlighted within the list window.
Next, within the Temperature group of controls, change the Amount spinner to 650.0.
Now, for both the Fuel and Temperature groups of controls, click on the buttons labelled Disabled in each, and choose Source From Intensity from the pop-up list. This will activate the map slots for both.
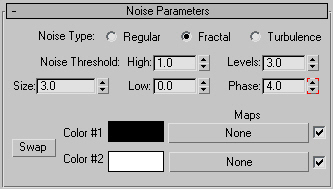
Click on the Map slot for the Fuel and choose Noise from the Material/Map browser.
Open up the Material Editor and drop the map from the FumeFX UI floating dialog into one of the sample slots. Choose Instance.
Once the map is in the Material Editor, change the Noise Type from Regular to Fractal.
Click on the Size spinner, and adjust it's value to 3.0, then grab the Phase spinner and change it to 4.0.
Next comes the animation for this map.
Turn on the Auto Key button and drag the time slider from frame 0 to frame 150.
Back in the Material Editor, change the Phase spinner's value from 4.0 to 16.0.
Make sure the animation track is linear and not bezier. You want to make sure that the noise animates evenly over time and doesn't start and end slowly.
With the animation now in place, drag the map from the Material Editor back into the FumeFX UI and drop it into the Temperature Map slot. Choose Instance so that both maps work identically.

Fuel and Temperature with the same map
At this point, let's go through our checklist for your last tutorial simulation:
FumeFX UI placed where we want the simulation to occur? CHECK.
FumeFX Object Source helper created to reference our scene geometry to be used as a source? CHECK.
Other scene geometry selected to be used as a collision objects in simulation? CHECK.
Additional channel maps inserted into Source components (Fuel, Temperature) to refine simulation? CHECK.
Lights added to the Illumination tab to light the smoke and fire? CHECK.
Simulation parameters adjusted for a sample run? CHECK.
Now you are ready to run a test simulation.
Open the Preview Window so you can monitor the output.
Click on the Start Simulation button within the FumeFX UI floating dialog.
This simulation may take between 30-60 minutes to simulate depending on your machine's processing power and memory, and will take up approximately 2.5GB of disk space for the data storage as designed. The increase in size here from the last tutorial is that you added two additional channels to this simulation from the smoke-only one (Fuel and Velocity). If you would prefer, you can knock down the Quality spinner from 3 to 1, and adjust the Spacing spinner from 1.0 to 3.0 to help reduce the time and space required.
What you'll see during the simulation in the Preview Window is some of the smoke being deflected by the teapot top, while some is trapped beneath the curved surface of the top travels downwards.
Once the simulation is complete, render the animation out to see your result.
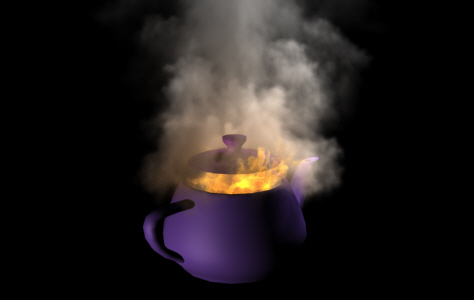
As you can see in this image, as the teapot lid gets close to the fire and smoke, it will wrap itself around the object and not penetrate it. Now that's cool!