Wavelet Turbulence
In this tutorial you will learn how to add more detail to simulations using Wavelet Turbulence feature.
In 3ds Max, select File->Open, and from your /Scenes/FumeFX/ Tutorials folder, select the file Tut_05_start.max.
This tutorial essentially begins where Tutorial 2 finished.
You might have noticed that Tutorial 2 could have benefited from more detail, especially in close up shots. This could be done by decreasing Grid Spacing parameter to value of 1.0 or even 0.5, which would create a simulation with many more voxels. However, reducing Grid Spacing has great impact on memory requirements and simulation time, so we`ll try another approach called Wavelet Turbulence. Thanks to this method, it is possible to create a detailed version of a simulation based on an existing, low detail simulation quickly and efficiently.
Because Wavelet Turbulence uses its own caches for output, make sure that inside the FumeFX Preferences, Auto Synchronize Paths is enabled.

On the General tab, inside the FumeFX Output rollout, change the Output Path so that it is valid on your machine (currently it is set to C:\tut_05_start\FumeFX01_.fxd). Since we have Auto Synchronize enabled, Wavelet Turbulence`s Output path will be changed automatically.
Select the Sim tab and scroll down to the Extra Detail rollout and change selection to Wavelet Turbulence.
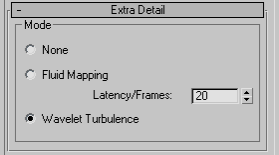
By using this option, FumeFX will, during Default simulation, pre-compute the data required for Wavelet Simulation Step.
TIP: If you are starting a scene from the scratch and you have Wavelet Turbulence on your mind to enhance a simulation, you will need to select this option only when you`re satisfied with how your low detail simulation looks. Since this option adds to overall simulation time, there is no need to have this option selected unless your next step is to create a Wavelet Turbulence simulation.
Enable the GPU Viewport Display and click the Simulate button.
When this step is complete, you`ve added the pre-processed data for Wavelet Turbulence, and can now add the extra detail.
Select the WT-P tab (Wavelet Turbulence - Post Processing) and set Grid Detail Scale to 3.0. This will create a final grid that is equal to Grid Spacing of 0.66 (Grid Spacing/Grid Detail Scale -> 2.0/3.0 = 0.66).
Next, activate the Fire checkbox and change Fire Strength to 4.0. This will create more pronounced Wavelet detail on our plasma.
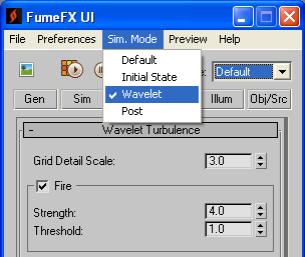
Now, you need to change Sim. Mode to Wavelet so that you can create the extra detail in another simulation pass
Click on the Sim Mode menu and choose Wavelet from the dropdown. You will notice that Start and Continue buttons in the FumeFX UI change with the Sim. Mode change.
Before clicking on the Simulation Start button, make sure that Default Output caches are selected as input.
Click on Start Wavelet Simulation button and wait until simulation is done.
To be able to view what the Wavelet Simulation has computed, you now need to change input cache. To do that, you need to select Wavelet from the Cache dropdown list.
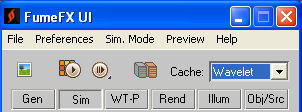
You can go back to Default caches by selecting Default from the same list.

Now, if you render both animations, you will notice that Wavelet simulation kept the same motion from the Default caches, but has added more detail.
Just as a summary, in order to create additional detail in a low resolution simulation, you need to do the following:
First, create a lower detail simulation using a Default cache.
When you get motion that you like, within the Sim tab go to the Extra Detail rollout and change the Mode to Wavelet Turbulence - and run another Default simulation to pre-compute the data required.
Next, change the Sim Mode option to Wavelet, change parameters within the WT-P panel and then run your Wavelet Turbulence simulation.
Finally, to see and render the results, switch to the Wavelet input cache in the FumeFX UI.