Nodes
FumeFX comes with over 150 diferent nodes that can be combined together to create the most complex simulations.

Each node consists of:
- Default node name is displayed above the node itself. When you double click on the node title you can change its name.
- Additional description offers a quick reminder on some major node options. In this case it is the particle group that is show. Other nodes can display some of its parameters.
- Most of the nodes that generate particles have the particle stream pin on the output side. This pin is located at the right side of the node header and in most cases user does not need to connect it to the next node as the system creates those connections automatically with attributes pin connection. However, if node has additionan particle outputs then user will need to create connections manually.
- All nodes have attribute pins that are used to pass attributes and values between various nodes. As soon as the attribute pins are connected the system will automatically connect particle link pins and leave them hidden.
- Node enable/disable button is used to manually disable the node. Once the node is disabled, the button wil turn red and all the nodes behind it in the branch will be disabled too. In the case that something`s wrong with the node network connections, this button will turn red and execution will be halted.
- Nodes by default displays only the most common pins to make its visual footprint as small as possible. If you want to see all pins, you can use arrow to open up the node pins and it will stay open. To temporarily open the node and display all pins simply click on the pin name.
- Input particle stream pin is in located on the left side of the node header. If its show in orange color it means that its required for node to operate.
- Required attribute pin is displayed in orange and the node cannot operate until it`s connected or until it disappears (which migh happen when you connect attribute pins on that node).
Each pin is of a specific type and it can be a numerical type (Bool, Integer, Float, etc..) or data type (Particle, Object, Array, Particle Group, etc..).
When you right click on the pin, you can see available data types. Some pin types can be changed by the user while some are fixed. For example, if the output pin is of a float3 type and you convert it to a float type and the output will be a length of the float3 (the length of velocity vector is a scalar value - speed).
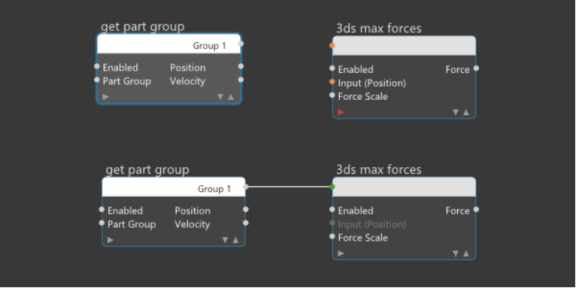
For example, in the case of 3ds max forces node it seems that both input pins are required. However, you can connect either one and the node will be able to perform its calculations.
Note: Nodes that are connected into a logical unit must have at least one connection. If there isn`t any attribute connection (pins 4 or 8) between two nodes, then nodes must be connected by the user using particle stream pins (pins 3 and 7).