FumeFX Tex3D
This texture map allows you to read voxel data and turn it into shader output. With finalRender`s fR-Volumetric you can even create your own flexible FumeFX shader.
To be able to get more realistic fire rendering, we will add an effect of heat distortion. Heat distortion effect occurs because the index of refraction varies with the air temperature. We will fake this effect by using a plane with a material which IOR varies with the temperature inside the grid.
Please load Tut_10_start.max scene in your 3ds max.
Select FumeFX01 grid and adjust output paths.
Go to the Simulation tab and set Vorticity to 1.0, X Turbulence to 0.5 and Turbulence Noise Scale to 5.0. This will add some interesting motion to the fire.
Before you start the simulation, keep in mind that FumeFX will also export temperature as it`s going to be used in the Texmap.
Simulate first 100 frames.
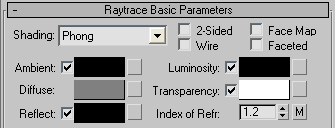
Open Material editor and create a new Raytrace material.
Change Transparency to white, Index of Refr to 1.2.
Set Specular Level to 0 and Glosiness to 0.
Click on the Refraction IOR MAP and select FumeFX Tex3D.
Inside FumeFX Tex3D, click on a "Pick FumeFX" button and select FumeFX01.
Change Channel to Temperature and leave Type at Generic as Generic type is the only type that can be used to alter IOR.
Set Max. Value to 300 (as it is set by the Simple Source01).
Right click on the Opacity AFC and disable it. We won`t need it in this tutorial.
To vary IOR with the temperature, we will need to use FumeFX Tex3D`s Gradient. Double click on the Color Gradient to open it. Double click on the first color Key and set it`s RGB channels to 10,10,10 and leave second key to white. Close Gradient.
Go one level up (to Raytrace material) and name it HeatWave. Apply this material to Plane01.
Select Background material, open its Diffuse map and select Tut_10.jpg that is located inside tutorials folder.
Render 100 frames sequence.