Effectors
Effectors allow a user to control almost any parameter on a per-voxel basis. For example, by using Effectors it is possible to have localized gravity, or even Vorticity that depends on the voxel velocity. A Master Effector can directly control amount of smoke, fire, fuel, temperature and color in a voxel.
In this tutorial, we will teach you how to use Effectors.
In 3ds Max, select File->Open, and from your /Scenes/FumeFX/ Tutorials folder, select the file Tut_07_start.max.
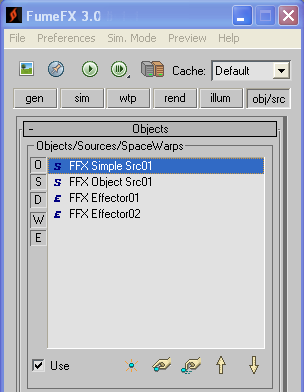
This is a simple scene and contains a FumeFX grid, one Simple Source, an Geometry Source and two Effectors. We will use these Effectors to create smoke based on the velocity in the grid.
In this file, FFX Simple Src01 is emitting Temperature and Velocity channels while its Fuel and Smoke channels are disabled.
Create an FumeFX Effector and position it directly above FFX Simple Src01. Set effector shape to Sphere; it`s effect will now be localized only to voxels within the spherical shape. Set Diameter to 11 and position`s z coordinate to 30.

Each Effector has a Channel Name parameter which is used to select the FumeFX parameter(s) you want to control.. Set the Effector`s Channel name to "eff1". Select the FumeFX Grid, open the obj/src tab and add FFX Effector01 to FumeFX.
Select the sim tab and open the smoke rollout. You`ll notice that Effectors can be applyed not only to FumeFX parameters, but to FumeFX channels as well. Since we want to create smoke based on the velocity in the grid, that`s exactly what we need. Under the Smoke Rollout, click on the Master Effector icon - Master Effectors are used to assign effectors to channels. The Effector Connect dialog will open. Type "eff1" into the field, which will assign the entered channel name to the selected parameter (in this case, the smoke channel).
Go to obj/src tab, select FFX Effector01 and change Input Type to Velocity. Our Effector`s output will now be controlled by the Velocity field. Set Range Minimum to 2.0 and Maximum to 3.0. This means that velocities between 2.0 and 3.0 will be converted to 0.0-1.0 range. The resulting value is passed to the Output module.
For now we will have the Output Value AFC disabled, but we will use it later to perform additional tweaks of the Output value (and even invert it).
Set Output Type to "Add" which means that the Effector will add to the Smoke channel.
As this Effector will be used to add smoke to the grid, the maximum amount that will be added is defined by the Scalar Value; set it to 0.1. A higher value will add more smoke to the grid.
Let`s analyse how our effector will be applied. With it`s Input Type set to Velocity, channel name connected to the Smoke Master Effector, and it`s shape is set to sphere, it will read velocity values from the voxels located inside the sphere and convert them (based on current Range Min/Max values) to 0.0-1.0. Finally, our scalar valueof 0.1 will adjust that 0.0-1.0 range to 0.0-0.1. This new range will be used to add to the smoke channel.
Now create another effector and position it above Sphere01 (the emitting object of FFX Object Src01). Open FumeFX UI and from obj/src tab pick FFX Efector02.
From the listbox select FFX Effector02 and set the Effector`s Shape to Box and set it`s Width/Length/Height to 22/15/44. Z coordinate should be around 36. Set Channel name to "eff2", Input Type to Velocity, Output Type to Add and Scalar to 0.1, as before. Since Geometry Source is emitting only temperature, velocities will result only from buoyancy and will achieve much lower values. Set Range Min/Max to 0.3-1.0.

Go to the Simulation tab and scroll down to the Smoke rollout as before. Open the Smoke Master Effector Connect dialog and click on the "..." button; all channels of all effectors added to the selected FumeFX Grid will be listed here. Click on "eff2"This will append ???eff2" to the list of channels that control this parameter.
Before you start simulating this scene, make sure to adjust your output paths.
Once you start simulation, you will notice that the Effectors are creating smoke based on the velocities in the grid. For our first effector, a smoke value of 0.1 will be added to voxels that have velocity of 3.0 and higher, while in the areas of velocity below 2.0 no smoke will be added.
But what if you want to add the smoke the other way around?
Fortunately, there is a quick and effective way to do that by using Output Value AFC.
You need to keep in mind that input is on horizontal axis and output on vertical axis. To invert how smoke is added all we need to do is to invert this AFC like on the image below.
You can read it in the following way. When input is 0.0, output will be maximum (0.1 in our case) and when input is 1.0, output will be 0.0.
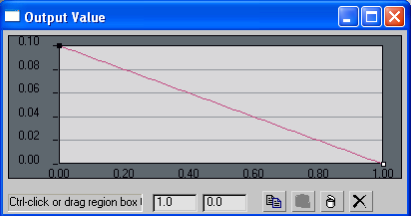
When you run Simulation it will become obvious that most of the smoke is now added to areas with low velocity, the opposite of what we had in the first step.