Effector and falloffs
This tutorial should shed some light over three effector AFCs: Shape falloff AFC, Output value AFC and Radial multiplier AFC.
Please load Tut_11.max scene in your 3ds max.
You will find a FumeFX grid and a box Effector. The FumeFX gird is contained within Effector so that the center of the Effector lies on the FumeFX`s right boundary, and the left Effector boundary matches the left FumeFX`s boundary.
Select FumeFX01 and go to the obj/src rollout. Select FFX Effector01 and set Input Type to Constant, Output Type to Replace and Scalar to 1. This will effectivly fill the FumeFX grid with low density smoke.
FFX Effector01 is already connected to FumeFX Grid and it`s Smoke Master Effector. That means that it will directly affect the smoke channel in each voxel.
Note that the FumeFX grid`s adaptive mode is disabled for the effector to create values in the grid without any values in the volume
Run the simulation.
After the simulation is done, open the FumeFX Preview Window. Scrub the time slider and notice how smoke fills the grid uniformly and nothing changes with time because effector replaces smoke values in every frame.

Let`s say we want to add smoke to the grid in such way that it has more density near the center of the effector and less density near effector boundaries.
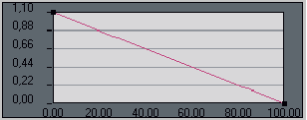
Click on Radial multiplier to activate it. The AFC dialog should pop up, showing a reversed linear curve.
Run the simulation.
As you can see, Radial multiplier AFC has modified the output value based on the distance between the Effector`s center and its boundary. As a result, the smallest smoke amount is applied to the voxels that are further away from the Effector`s center.
Now right click Radial Multiplier AFC and choose disable.
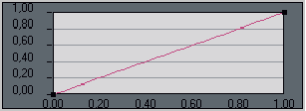
Activate Shape Falloff AFC by clicking on it. Make sure it is also set to a reverse linear curve.
Run the simulation.
Simulation looks the same (as with Radial Multiplier AFC) in the first frame. But as the time progresses, smoke fills the grid until density is uniformly distributed.

Here is an explanation why those two methods become different as the simulation progresses.
Radial Multiplier AFC is applied before the Effector operation (and after Output value AFC) while Shape falloff AFC is applied after. This means that the Radial Multiplier AFC will set values based on the distance between effector center and effector boundaries, then these values will replace smoke densities of voxels in the grid.
On the other hand, in the last simulation Shape Falloff AFC blended Effector value with values from the grid in a way that voxels closer to the Effector boundaries had the smallest influece from the Effector, while voxels closer to the center had maximum influence.
In each succeeding frame, the effector blended values from the grid (calculated in the previous frame) with calculated values based on the distance between the effector`s center and effector`s boundary, causing the grid to gradually fill with smoke.
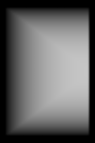
Next, disable the Shape Falloff AFC and change its Input Type to Texmap. Noise map is already assigned to Map.
Activate the Output Value AFC, and set it to a linear curve.
Run the simulation.
You can see smoke has been created based on the map values.

In areas where the map is black, no smoke is created; in areas where the map is white, smoke density is set to Scalar value (in this case 1).
Now go to the Helpers section of the Create Command Panel and choose FumeFX.
Next, select an Effector from the list and drag it out in any of the viewports.
Change Effector Shape to Free.
Now set Channel name to smokeEff; that`s the same channel first effector is operating on.
Set Input Type to Constant, Output Type to Replace, Scalar to 1, and deactivate all AFCs.
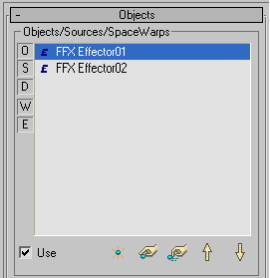
Now open Fume UI and switch to obj/src tab. Add this effector to the list. Make sure our new effector is appended at the end of the list.
Run the simulation.
The entire grid is filled with smoke.

You might wonder what happened to the first Effector; as both effectors share the same area of influence. The order in which effectors are listed in the Object/Sources/SpaceWarps list reflects the order in which they are applied. Since second effector uses a Replace operator (without Shape Falloff), it has written over and replaced values the first effector set.
Now reverse the order of the effectors; select first effector and click  arrow to move it down.
Run the simulation.
Only effect of the FFX Effector01 is visible now.