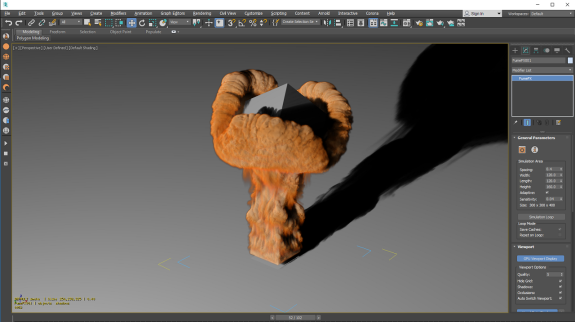
Command Panel
General Parameters

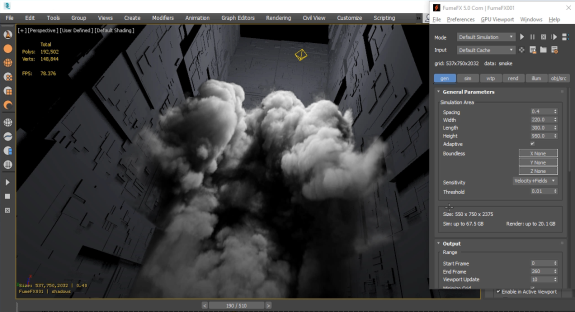
The General Parameters rollout contains the parameters of your simulation area and the overall grid size. This group of controls is also available in the Floater Window; one difference is that in the Modify panel, this rollout also includes the main toolbar - your gateway to other parts of the interface.
 FumeFX UI/Floater - This button opens the main part of the FumeFX user interface - the FumeFX UI floating window.
 About FumeFX - Selecting this icon opens a dialog box that displays your FumeFX version. Inside this dialog you can also reauthorize the FumeFX, FumeFX SL or mental ray shader plug-in.
Simulation Area
In this rollout you will also find a group of controls for FumeFX grid dimensions and detail. You can also access these controls under the General tab of the FumeFX UI floating dialog.
Spacing - This parameter directly affects the detail level in your simulation. Type in or use the spinner to set the spacing of the voxel-based grid. The chosen value defines voxel size; smaller voxel size allows for more voxels in simulation, which produces greater detail.
Width, Length, Height - These three values set the volumetric dimensions of the FumeFX Grid, thereby establishing the boundaries for simulation within the scene.
Adaptive - While enabled, the grid will expand and shrink with the movement or absence of fluid to use only the necessary portion of the overall grid space. It is highly recommended to leave this enabled because it reduces simulation time and file size.
Sensitivity - When the Adaptive option is enabled, this parameter defines the boundary`s sensitivity to the production of smoke/fuel/fire. The larger the number, the tighter the adaptive box will be. Leave this value between 0.1 and 0.01.
Note: If there is a source that does not emit any matter, but just produces wind and you want FumeFX to enlarge grid accordingly to the wind strength, set the Sensitivity value to zero.
Simulation Loop - It is convenient that the simulation loops through the simulation range while you`re tuning simulation parameters. This way you can focus on initial parameters setup without the need to re-click on the simulation button.
Save Caches - While you`re looping simulation and tweaking parameters on a low resolution grid, it might be handy that you do not save any caches to gain a bit more speed.
Reset on Loop - When loop reaches the end of the simulation range, the simulation grid will be reset.
Viewport Rollout
By default, your simulation will not appear in the 3ds Max viewports. In the Viewport rollout, you can enable and adjust this viewport display.
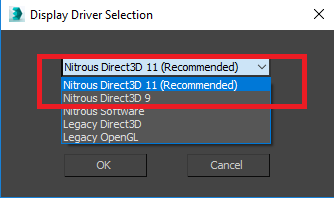
GPU Viewport Display - This large button toggles the viewport display on or off. FumeFX GPU display can be active in one perspective/camera viewport only. Make sure to use Direct3D 11 or Direct 3D 9 for the Viewport driver as the FumeFX GPU Viewport will not be able to operate otherwise.
Since FumeFX requires loading of output files in order to display its data, it could take some time before the viewport updates.
However, the display was designed not to cause significant lag of your 3ds Max viewport, so rotation and panning actions will be smooth, although the FumeFX display update might lag behind the 3ds Max viewport update.
* The GPU Viewport is supported in 3ds Max 2016 and newer.
Viewport Options

Quality - Determines the overall display quality. Keep in mind that high quality viewport display will require faster graphic card.
Hide Grid - Enable this option to hide most of the adaptive grid box from the viewport.
Shadows - This option has to be enabled in order for FumeFX to compute self shadows and shadows from FumeFX to objects in the scene.
Occlusions - This option has a great impact on the overall look inside the viewport. If enabled, it will result in correct rendering, shadows and blending of FumeFX volumetrics and scene geometry. The downside is that it can be time consuming.
Auto Switch Viewports - When enabled, whenever you select any perspective viewport, the GPU Viewport Display will become activate within it. Otherwise, the GPU viewport will activate only when FumeFX grid is re-selected.
Multiview - Allows display of multiple grids inside the viewport at reduced quality. This option will display all other FumFX grids that have GPU Viewport Display option enabled.
Voxel Data Display - This button enables display of various FumeFX data inside the viewport with a series of colored quads.
Display Optimize
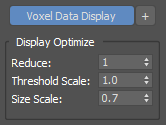
Reduce - Use the spinner to set the level of detail; the viewport will display every nth voxel across all 3 axes.
Threshold Scale - This value acts as a multiplier for the individual threshold values of each channel. For each channel, the corresponding threshold spinner sets the minimum value that will be displayed, in FumeFX units (Smoke, Fire and Fuel), or world units (Velocities and Forces).
Size Scale - Increase of decrease the viewport polygon size.
Channel/Threshold
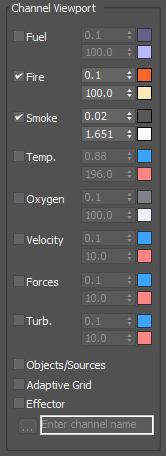
In FumeFX, you are able to select which channels are exported to the output file for rendering. This group of controls will let you mix varying intensities of these channels in the viewport display. Of course, channels that are not present in the output file cannot be displayed in the viewport. If a simulation is in progress, only the channels used in the simulation can be displayed.
Select the Channels that you want to display. Then, adjust the corresponding Threshold spinners to set the minimum and maximum values for display.
Fuel - Shows unburned Fuel.
Fire - Shows reacting Fuel.
Smoke - Shows Smoke.
Temp. - Shows Temperature.
Oxygen - Shows unburnt oxygen inside the FumeFX grid.
Velocity - Shows Velocities in the grid. In order to view velocities, they must be exported first. Interpolation between two colors is done based on the Hue.
Forces - Shows Forces (in case FumeFX is bound to any).
Turb. - Shows Turbulence as created through the Simulation controls.
Objects/Sources - Shows voxels that are occupied by the collision object or source.
Effector - This option enables you to visualize the strength of Effector(s). It is possible to visualize them after simulation is done as an Effector usually requires channels like Smoke, Temperature, etc. to be present in the grid. To be able to visualize an Effector that uses Velocity channel as in input, you will have to export velocities. If you want to see the effect strength of more than one Effector, you need to list all the names separated by the comma sign (for example: eff1,eff2,smokeEff,testEff).
Scale Multiplier

The Force and Velocity vectors can be scaled for an exaggerated or disparaged display.
Show Slice

Show Slice - If you enable this checkbox, you can view the fluid values on an intersection of the grid with a specified 2D plane. To do this, select from three axes pairs in local space (XY, YZ, or XZ); then, adjust the Position and Thickness spinners to determine the exact location shown.
Position - Once the Show Slice checkbox is on and a slice plane is set, use this spinner to move the slice plane along the FumeFX Grid volume to see the voxels within the grid.
Thickness - Once the Show Slice checkbox is on and a slice plane is set, use this spinner to determine how many cells within the volume are shown as part of the current slice.
Grid - Selecting this will show a voxel grid on the slice and turn off the FumeFX grid display on the sides.
Numerical Values - This option will write out the contents of each voxel cell with 2-digit precision. This can be handy when you want to see what cells within your simulation contain and the values associated with the voxels.
Voxel Grid
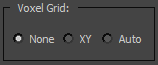
Checking this option enables you to see the dimensions of voxels used in the simulation; these dimensions can be projected to one or more sides of the grid.
None - No grid is shown.
XY plane - Shows the grid on the bottom of the FumeFX simulation.
Automatic - Shows the grid on all sides that appear "inside" the current view.