Cigarette Smoke
In this next tutorial you will learn how to use noise maps to control the look of your smoke.
In 3ds Max, select File->Open, and from your /Scenes/FumeFX/ Tutorials folder, select the file Tut_03_Start.max.
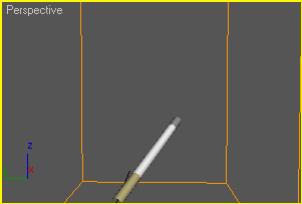
Create a FumeFX Grid over the cigarette in the Top or Perspective viewport. Make sure the height of the FumeFX Grid volume is about 115 units.
Next, create a FumeFX Geometry Source helper in any viewport then select the object named fire for your Geometry Source (this is the tip of the cigarette).
Re-select your FumeFX Grid and go to the Modify Command Panel, then open the FumeFX UI floating dialog.
As you have done in previous tutorials, Go to the General tab and set your output path for the simulation to be stored. If you`ve followed our suggestion, simply create a new sub-folder called \Tut03 beneath the \FumeFXSimData folder.
Now that the path is set up, let`s start setting our smoke up for our cigarette.
Still within the General tab, go to the Simulation Area group of controls and set the Spacing value to 0.4.
This will result in a denser simulation grid of voxels, and will result in a more detailed simulation. Understand this will also take up more disk space to store and longer to sim. But since we`re going for realism here, this should do the trick.
Next set the Sensitivity spinner to 0.05.
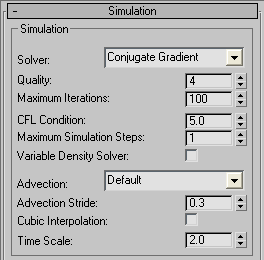
Once complete, select the Simulation tab in the FumeFX UI floating dialog.
Under the Simulation group of controls set the spinners to the following values:
Quality spinner to 4.
Maximum Iterations spinner to 100.
Advection Stride spinner to 0.3
Time Scale spinner to 2.
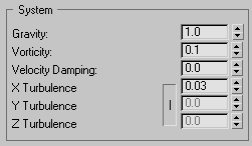
Next, go to the System group of controls and change the following spinners to values provided:
Vorticity spinner to 0.1.
X Turbulence spinner to 0.03. (NOTE: that this value will affect X, Y and Z turbulence values since they are currently linked)
Once these parameters are set for our smoke, we need to tell FumeFX NOT to generate any fuel, which would create fire as well. Obviously, for a cigarette, we don`t want the end burning like a match or candle. We just want the smoke to be simulated and emitted from the tip.
Under the Temperature group, set the Temperature Buoyancy spinner to 1.5.
Under the Fuel group of controls, click on the Simulate Fuel checkbox to de-select it.
To continue this process of turning off Fuel and Fire, go to the Rendering tab next and within the Fire rollout, click on the Fire checkbox to de-select it as well.
Still within the Rendering tab, under the Smoke rollout change the Opacity spinner to 5. This will help give you more visible cigarette smoke.
Once complete, the only thing that will generate within this scene is Smoke. Now you need to tweak the smoke parameters directly. This involves adding all of your sources and objects to the simulation engine.
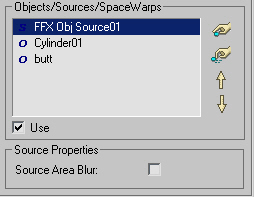
Select the Obj/Src tab in the FumeFX UI floating dialog.
Click on the Pick button, and within the 3ds Max viewports, choose the FFX Object Src01 you created earlier. This will act as the smoke generation source.
Click the Pick button again, and this time choose both the Cylinder and butt objects from within the 3ds Max viewports. They will show up as Objects (prefaced with the letter `O`) within the simulation and will collide with the smoke as the cigarette animates.
Okay, so you have your sources now for the simulation. Let`s now look at some of the advanced controls for your sources.
Highlight the FFX Object Src01 within the list.
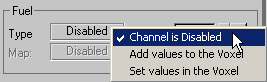
Next, go to the Fuel group of controls and click the button that says Set (next to the Type label). Choose Channel is Disabled from the pop-up list. Again, we want to turn off fuel calculations in this sim.
Next, you`ll add a procedural Noise texture map as a mask for the smoke to help control the look.
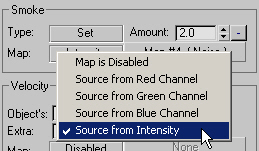
Within the Smoke group of controls, click on the button labeled Disabled and choose Source from Intensity from the pop-up list. This will activate the Map slot next to it.
Now click on the Map slot button that says None. This will bring up the standard Material/Map browser.
Choose Noise in the Material/Map browser so that it shows in the map slot in the FumeFX UI floating dialog.
Next, open the 3ds Max Material Editor so you can edit the Noise map.
Simply drag and drop the Noise map from the Smoke group of controls in FumeFX to a blank material slot in the Material Editor and choose Instance.
Under the Noise Parameters rollout, make sure that Regular is the Noise Type and change the Size spinner to 6.35.
Close the Material Editor.
At this point, let`s go through our checklist for a smoke-only simulation:
FumeFX UI placed where we want the simulation to occur? CHECK.
FumeFX Geometry Source helper created to reference our scene geometry to be used as a smoke source? CHECK.
Other scene geometry selected to be used as a collision objects in simulation? CHECK.
All Fuel and Fire creation checkboxes de-activated? CHECK.
Simulation parameters adjusted for a sample run? CHECK.
Now you are ready to run a test simulation.
Enable the GPU Viewport Display so you can monitor the output.
Click on the Start Simulation button within the FumeFX UI floating dialog.
This simulation may take between 20-40 minutes to simulate depending on your machine`s processing power, and will take up approximately 800MB of disk space for the data storage as designed. If you would prefer, you can knock down the Quality spinner from 4 to 2, and adjust the Spacing spinner from 0.4 to 0.8 to help reduce the time and space required.
Once the simulation is complete, render the animation out to see your result.
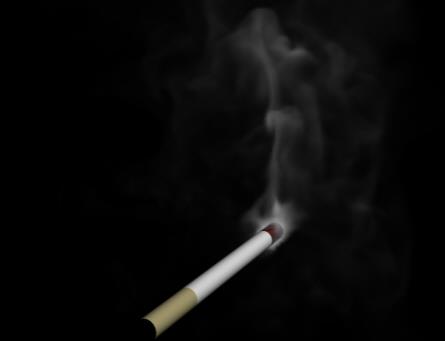
Within the viewport, simply by scrubbing the frame slider after the simulation is complete, you should notice the smoke moving with the cigarette source and how the base of the cigarette acts as a collision object. You can see how the noise map is affecting the smoke patterns.
On your own, you can play with different map types to see how they affect the smoke generation. If you want, turn off the Noise map and re-simulate to see exactly how much detail the Noise map adds. Or if you prefer, try to animate the Noise map parameters over time to see how that influences the smoke generation and simulation.
Okay, so now you have a sense of how to add a map to your sources. Time to move on to even more complex simulations including lighting your smoke and fire effects.