Tutorials
Tutorial 1: Octane Shader
In this introductory tutorial you will learn how to use the Octane Shader. The Octane Shader is AfterBurn's ultra-fast rendering algorithm that helps you quickly create dust and vapor trails.
- In 3ds Max, select File->Open, and from your /Scenes/AfterBurn/Tutorials folder, select the file AB-Tut1.max.
- After the file loads, scrub the Time Slider.
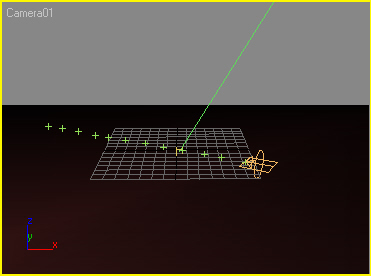
You'll see a Super Spray emitter, moving left to right (trailing a line of particles) across the top of a flat Box primitive. You're going to add the AfterBurn effect to this particle system and adjust it so that it looks like light smoke.
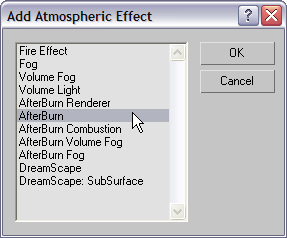
- To create the AfterBurn entry go to Rendering->Environment then from the Atmosphere rollout click Add.
- Select AfterBurn from the list and click OK.
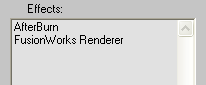
When the AfterBurn entry is added into the Effects list, you should notice that an FusionWorks Renderer entry is added automatically as shown below. All AfterBurn Environmental effects need this rendering engine in order render, and therefore it is added when any of these effects is selected. Make sure that This entry is located somewhere in your AfterBurn Environment Effects queue whenever you render with AfterBurn.
- Click the Pick button in the Source Particles/Daemons list box. The button will turn yellow to indicate that you should select a particle source from within your scene.
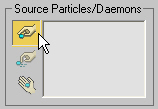
- To pick SuperSpray01, press H on your keyboard to bring up the Select by Name dialog box. From the Selection list, choose SuperSpray01.
NOTE: You can also move the mouse pointer over the SuperSpray01 object in the 3ds max viewports and click it directly. The Pick button will switch off automatically after you've picked the Super Spray emitter.
Next, we want to have the light in the scene affect the AfterBurn effect that we're creating.
- From the Source Lights list box, click the Pick button, then select Spot01.
Again, you can do this either by clicking on the Spotlight itself in the 3ds Max viewports or use the Select by Name feature (H-key) to pick the light.
- From the AfterBurn Rendering rollout, change the Engine type to Octane Shader.
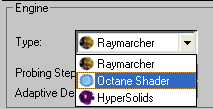
As was mentioned earlier, the Octane Shader is AfterBurn's very fast rendering engine and is good for creating dust and vapor effects.
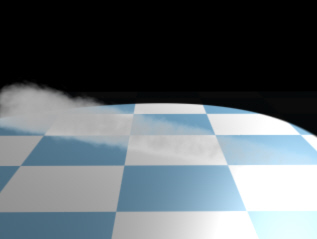
- In the Noise Animation Parameters rollout, change the Density from 3.0 to 0.1.
- Change Noise Type to Turbulent. Later you can experiment with different noise types.
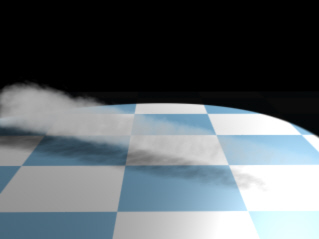
- Advance to frame 100 and render the Camera01 viewport.
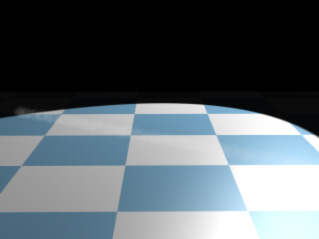
Notice that the smoke trail is way too light and does not look realistic since it should spread as it moves away from the emitter. In order to make the smoke trail grow as the emitter moves away, you'll need to animate the size of the volumetric effect over time. You do this within AfterBurn through its Animation Flow Curves (AFC).
- In the Particle Shape rollout, right-click over the Sph. Radius AFC button and select Enable.
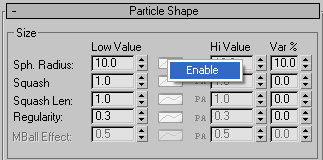
Once set, the AFC button will highlight, and you should also see that the High value spinner control becomes enabled. By default, the AFC controller will animate a value in a linear fashion over the course of the AfterBurn effect from the Low to the High value.
- Set the High value Sph. Radius to 50.0
- Next, in the Noise Animation Parameters rollout, enable the Noise Size AFC.
- Set the High value for the Noise Size parameter to 30.
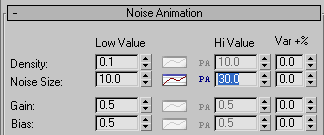
This will make the noise grow together with the volumetric spheres.
- Now, render frame 100 again.
It looks better now, but some shadows would help provide depth to the image.
- Select Spot01, then from the 3ds Max Modifier panel, go to the Shadow Parameters rollout.
- Turn the spotlight's Shadows checkbox On.
- From the Shadows dropdown list, choose Ray Trace Shadow or Shadow Map. At this point it does not matter which shadow type you choose as those are used only to cast shadows from geometry to geometry and from geometry to AfterBurn..
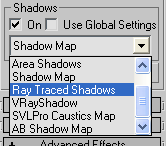
NOTE: This is still not sufficient for AfterBurn to cast shadows, but you'll fix that in a second.
To be able to cast shadows from AfterBurn to geometry user has two options.
First option is to use AfterBurn Shadow Map (instead of standard 3ds max shadow types). This method is very fast for transparent self-shadowing volumetric effects.
Second option is to enable Atmospheric Shadows option from light. This will result in raytraced volumetric shadows, which can be very slow for transparent effect rendered using Raymarcher. In this tutorials, we'll use this second option.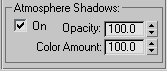
- Back in the AfterBurn Environment rollout, within the Rendering rollout, check the Self Shadows checkbox.

This will make AfterBurn cast shadows on the AfterBurn effect itself.
- Enable the Shadow Cast checkbox as well so that the AfterBurn effect cast shadows on the ground plane.
- Render frame 100 again.
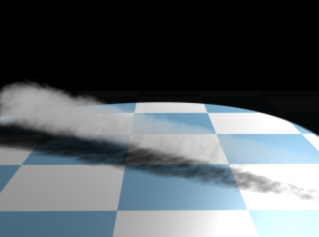
This looks okay, but the shadow is too dark for light smoke. We'll adjust that.
- Set the Shadow Opacity spinner to 0.3.
With Shadow Opacity, you can control the darkness of the shadows. Higher values will produce darker shadows. Since this is supposed to be light smoke, we don't want it as high, so the lower value produces a more realistic look.
- Render frame 100 again.
If you like, render out the complete animation (either an .AVI or an image sequence)
This introductory tutorial should have given you some idea of what is needed to create an AfterBurn effect. As you can see, it's easy to get started, yet there are plenty of options available to refine your effects. In the next tutorial, we'll start working with the color gradients and the look of the noise that AfterBurn uses.