Rendering
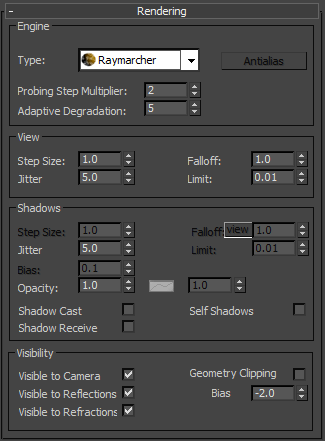
This rollout is where you control all of the shading controls over your AfterBurn effects. All lighting interaction is handled here as well.
Engine
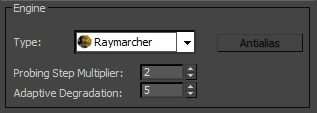
This group of controls affects the overall quality of the AfterBurn volumetric effects and are used to help tweak the look and speed at which AfterBurn renders its effects. Also, volume tracer type is selected here.
AfterBurn comes with three different types of rendering engines, and each one is useful for specific cases.
Raymarcher - The Raymarcher engine is a high-quality rendering engine in AfterBurn. It is capable of producing very crisp shadows on high-density smoke, explosions and clouds. Light interaction algorithms provide superb lighting and shadowing. However, they have a serious impact on the rendering speed because of complex calculations between AfterBurn and light interaction. Therefore, use it only if you really need the photorealistic output that the Raymarcher offers in your animation.
Octane Shader - The Octane Shader provides up to 10 times the rendering speed of the Raymarcher, but lacks the latter's crisp, self-shadowed volumetrics. This render engine is good for light dust and background smoke or "atmosphere" in your scenes.
HyperSolids - HyperSolids is a new way of rendering volumetric effects as blobby solids. This render engine is perfect for liquids or other organic solids like slime, jello and mud. With the HyperSolids engine, it is possible to render a volumetric effect as a true solid object with unlimited details but without a single polygon. Depending on the settings, you can use Noise as a Bump map, or as a Displacement map.
Antialias - This button can be used only with HyperSolids. Ideally, you might use another 3rd-party renderer within 3ds Max which supports anti-aliasing of volumetric effects, and render HyperSolids with it instead. There are several good options available on the market now. If you don't have one, the built-in anti-aliasing algorithm will do the job very well with the built-in 3ds Max scanline renderer, but it will be slower.
Probing Step Multiplier - Valid only for Raymarcher, this parameter tweaks the marching step size in empty volume. In effect, increasing the parameter makes rendering faster, but also increases chances for artifacts or missed details. Default is 1.0, which means no step size change. Value of 2.0 means that initial raymarching will be don by using twice as big step size. This parameter applies both to regular and shadows rays.
Adaptive Degradation - This parameter is another addition for faster rendering times. It is mostly suitable for raytraced shadows where the user can expect rending speed increases up to 20% faster. A value of 1.0 means that degradation of quality will start immediately with the first sample and thus presenting a bigger chance for visible artifacts. Lower values will apply degradation in a subtle way, taking care not to produce noticeable differences while reducing rendering times.
View
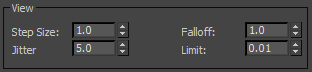
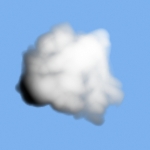
Step Size - This value indicates the step size of an integration path in 3ds Max world units. For an insight on how many steps will be performed, this value can be calculated using the formula: particle size divided by the number of steps. A lower Step Size value will produce a better-looking image. With very high density and a big step size, rendering artifacts may be produced. To avoid them, you should use smaller step sizes. Small step sizes are also required when rendering HyperSolids.
|
|
|
|
|
Step Size = 0.125 |
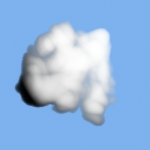
Step Size = 3.0 |
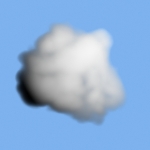
Step Size = 6.0 |
Jitter - this parameter will add fuzziness to the sampling. Use it to hide visible banding artifacs that can become visible on very high density Raymarcher effects.
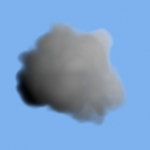
Falloff - The greater this spinner's value, the more opaque the volumetric effect will be. Lower values are good for clouds but will increase rendering times due to a higher number of samples that need to be calculated for each pixel of the volumetric effect. With Falloff set close to zero, the AfterBurn effect will be rendered in a similar fashion as 3ds Max's native Fire
Effect (in Rendering->Environment->Atmosphere->Effects). This is generally not desirable since all samples along a ray in this case contribute equally to the final pixel color. This tends to lessen the appearance of depth in the effect, making it hard to tell which areas of the "cloud" are near or far relative to your point of view.
|
|
|
|
|
Falloff = 0.25 |
Falloff = 0.5 |
Falloff = 1.0 |

Limit - Instructs AfterBurn when to stop ray marching along an integration path. Low values are used for high-density volumetrics while high values are used for low density volumetrics. With a higher limit value, rendering time will be faster. If a larger limit value (>0.1) is used on a very dense effect, rendering artifacts may occur.
Note: Follow and Limit parameters are not used for HyperSolids.
Shadows
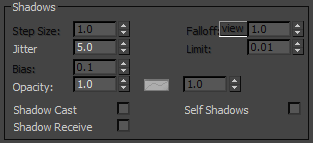
This rollout controls the shadowing within the AfterBurn volumetric effects.
With AfterBurn Shadow options enabled, the user also has to enable "Shadows" and "Atmosphere Shadows" option found in the light rollout to be able to cast (self)shadows. The method metioned above will have AfterBurn compute raytraced shadows. If you want faster shadows, use AB Shadow Map shadows for the light and uncheck "Atmosphere Shadows."
Step Size - This spinner determines the length of the sampling stride that will be used for stepping through the volume. More samples (lower number) will produce better quality output. When using AfterBurn Shadow Map, you can use smaller "Step Size" in order to get better quality.
Higher sampling produces more detailed and accurate shadows, but the tradeoff is that they take longer to render. A good starting point for shadows Step Size is to keep it around twice as big as Volume Step Size.
Falloff - This spinner makes the volumetric shadows appear lighter or darker, depending on whether it is smaller or larger than the Global Falloff setting within the AfterBurn Manager rollout. This makes the light "think" that volumetrics have different properties than those used for rendering a camera ray. When this value is lower than the Global Falloff value, the shadows will be ligther than normal, and when it's higher than the Global Falloff value, the shadows are darker.
Vol. - Uses the Falloff value you have set in the "Global Parameters" rollout.
Limit - This spinner tells the AfterBurn rendering engine when to stop tracing secondary rays needed for shadow calculations. For low-density volumetrics, use larger settings than those you use for high-density effects.
Shadow Bias - Similar to the map bias used by the native 3ds Max lights. The spinner moves the shadow toward or away from the shadow-casting AfterBurn volumetric effects. By default, this value is 1.0 world coordinate unit. Increasing the bias moves the shadow away from the effect, and decreasing the bias moves the shadow closer to the effect. The Map Bias value can be any positive floating-point number.
For example, if a shadow-casting AfterBurn effect flows into another AfterBurn effect, but its shadow doesn't appear to meet properly at the intersection, the bias is too high. This effect varies with the angle of the spotlight to the object. Extremely shallow spotlight angles usually require higher bias values.
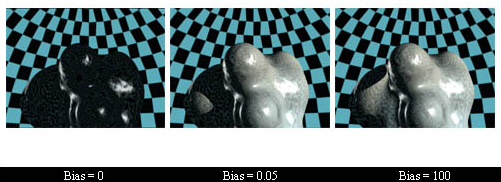
Another purpose of bias is to avoid problems with objects that cast shadows onto themselves. If you see streaks or moir?? patterns on the surface of the object, the bias value is too low.
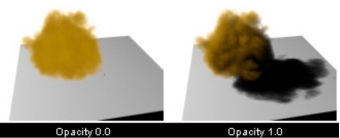
Shadow Opacity - An opacity of 0.0 means that there will be no shadow. This value can be animated over time via an AFC control.
Shadow Cast - When unchecked, AfterBurn will not cast shadows on other objects in your scene. For AfterBurn to cast shadows, the lights in your scene must be using AfterBurn shadows.
Shadow Receive - When this checkbox is enabled, AfterBurn will receive shadows from other objects in the scene.
Self Shadows - When this checkbox is enabled, AfterBurn will cast shadows onto the AfterBurn volumetric effect itself.
Visibility
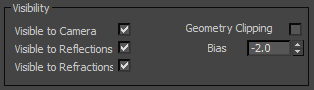
With the controls in this group you can limit visibility of an AfterBurn effect or even contain it within an object.
Visible to Camera - If off, AfterBurn will not be seen by primary rays cast from camera.
Visible to Reflections - If off, AfterBurn will not be visible in reflections.
Visible to Refractions - If off, AfterBurn will not be visible in refractions.
Visible to Reflections / Refractions will only work properly with 3rd party raytracers, such as finalRender and VRay. Because of Scanline renderer limitations, results with multiple reflections and refractions may not always be what you expect.
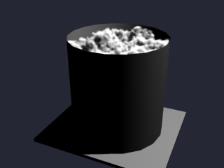
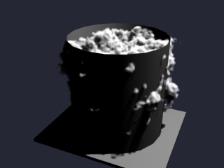
Geometry Clipping - If on, each AfterBurn particle will intersect geometry, from its center to the sampling point, and determine how much of the particle can be visible so that the effect will not go through or around faces. You should use 2-sided material applied to geometry. This option can be used to prevent AfterBurn effect be visible outside of a can, for example.
|
|
|
|
With Geom. Clipping |
Without Geom. Clipping |
Bias - To reduce possible artifacts at the geometry edges decrease bias. To spread the effect over the object edge, set value above 0.